3 Phase Float Switch Wiring Diagram

If you buy the wrong battery system for your three-phase home your electricity bill will not go down nearly as much as you expect. And with the economic return of battery systems being pretty marginal in even the best case scenario, it is super important that your battery gives you the best returns possible.
The bad news is: The wrong (or misconfigured) battery system on a three-phase home will only reduce grid electricity use on the battery's phase. It is therefore essential that you buy a battery system that is capable of offsetting your grid electricity consumption charges on all three-phases.
The good news is: Most battery systems can do this. You just need to check that the one you buy works optimally with your three-phase supply. The difference between a 3 phase battery system that reduces your bill on all 3 phases and one that doesn't is often 2 current transformers (CTs). They cost about $30 each.
This post will help you buy a solar battery system that plays nice with your three-phase home.
Warning: Some salespeople may look you in the eye and tell you that the battery system will work just fine on your three-phase supply. But you need to dig deeper. You need to make sure that the battery will work optimally on your three-phase supply. Here's what you need to know.
What is 3-phase?
Three-phase is a type of grid connection. It describes how your home is physically connected to the grid. All grid connected homes in Australia are either:
- single-phase
- two-phase, or
- three-phase
Single-phase: Most Australian homes have 'single-phase' electricity. This means that they have one live wire to their home carrying all their electricity. If you have single-phase, you can ignore this post and carry on with your day.
Two-phase: Two-phase supplies are rare, but some people have them. Two-phase means there are two live wires going into your home. If you have two-phase – you need to read this post as 2-phase battery systems have similar issues to 3-phase battery systems.
Three-phase: As people get bigger homes and more powerful appliances, such as large air conditioners and pool heaters, they may need more power than can flow down a single wire. For this reason, more and more homes are getting 'three-phase' connections. three-phase means that you get three live (or active) wires instead of one. It follows that you can have three times the power coming into your home. If you have three-phase power, the phases are red, white1 and blue. Your single-phase appliances run off one of those phases. Any large, three-phase appliances connect into all three-phases. As electric cars become common, more people will start to upgrade to three-phase so they can charge the car more quickly.
There are a gazillion configurations to choose from when installing batteries on three-phase
When I first sat down to write this, I thought I'd quickly draw up the possible configurations available. Then it dawned on me that there are about a gazillion. I present 16 different configurations here with their pros and cons.
Don't worry about understanding every single configuration. But I hope the following list makes you appreciate that it is really important that your solar installer understands what you need in terms of self consumption and backup from your battery and configures your system to suit. I am getting more and more cries for help from people who have dropped tens of thousands on three-phase battery systems that are not giving them the savings or backup that they expected.
Tip: If you are buying a three-phase battery system, ask your installer/salesperson which configuration they've gone for, then make sure it has the features you expect.
Tesla tip: Even if you are simply getting a Tesla Powerwall 2 on your three-phase home, make sure that you are getting 3 consumption CTs and your backup circuits will all be on the Powerwall's phase.
Definition: A 'consumption CT' is a little power meter (Current Transformer) that measures your grid imports and exports.
So here are 16 of the possible configurations for a three-phase solar power and battery set up2. If you are buying a system from scratch it could be any of these. If you are retrofitting a battery and want to keep your existing inverter, then you will have a much more limited choice.
Don't fancy plowing through 16 schematics? I don't blame you! Go straight to the summary here.
Configuration #1: three-phase hybrid inverter

A hybrid inverter is a single device that you directly connect both your battery and solar panels into.
A 3-phase hybrid inverter will convert the DC power output of both your solar panels and your battery to 3-phase AC power.
The three-phase hybrid inverter will monitor your solar electricity production and household consumption across all three-phases using little meters called Current Transformers (CTs), which are the green things on the diagram. It will use this information to know when and how much to discharge your battery so that you always use battery power instead of grid electricity imports wherever possible. It does this by instructing the battery to push out just enough power to offset the grid imports in real time.
Advantages:
- A 3-phase hybrid inverter balances your phases (which helps grid stability)
- It minimises voltage rises to the grid (because any load is shared over 3 wires).
- By default, the battery reduces your consumption across all three-phases, optimising your savings.
- A relatively simple, installation.
- If the inverter has a backup feature and enough power, it can back up every phase in the house.
Disadvantages:
- It is expensive. There are only two-three-phase hybrid inverters currently on sale in Australia. A 5kW Fronius Symo Hybrid retails at about $4,000 just for the inverter3, and a SolaX X3-HYBRID-5.0T costs just over $3,000.
- Can't be done for AC coupled systems like the Tesla Powerwall 2 or Enphase batteries. This is for DC coupled batteries only. And the batteries must be compatible with the specific inverter model.
Configuration #2: 1 single-phase hybrid inverter with 1 consumption CT

A single-phase hybrid inverter will convert the DC power output of both your solar panels and your battery to single-phase AC power.
In this configuration, the single-phase hybrid inverter will monitor your solar power production and household electricity consumption across only the phase it is connected to. This means you will only get the benefits of solar energy consumption on that phase.
If the inverter features backup, then you can only back up the connected phase.
Advantages:
- A relatively simple, installation.
- Cheaper than a three-phase hybrid inverter.
Disadvantages:
- A 1-phase hybrid inverter does not balance your phases, so you are often limited to 5kW of exports by your DNSP.
- All the load is going down a single-phase, sometimes causing voltage rise issues when exporting. This can trip or limit your inverter operation.
- The battery only reduces your consumption across one phase, reducing your electricity bill savings.
- Can't be done for AC coupled systems like the Tesla Powerwall 2 or Enphase batteries. This is for DC coupled batteries only. And the batteries must be compatible with the specific inverter model.
Configuration #3: 1 single-phase hybrid inverter with 3 x consumption CTs
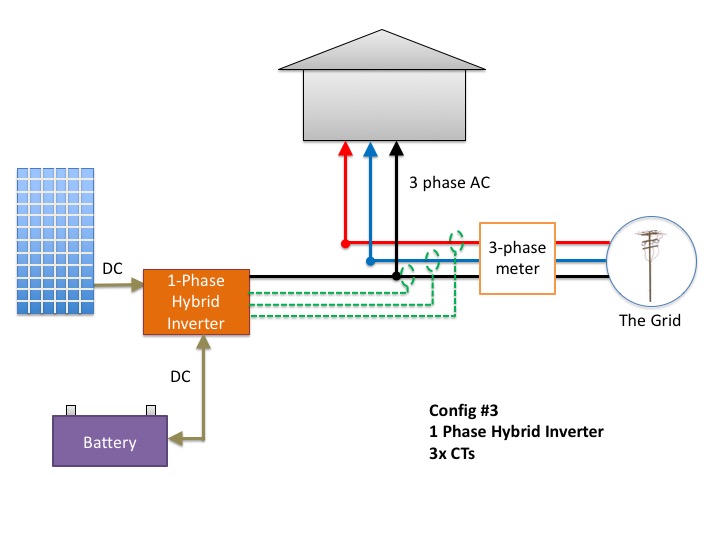
Some single-phase hybrid inverters allow you to connect 3 CTs, one for each phase. They can then export enough on the connected phase to offset grid imports across all three-phases. When this battery power gets to the 3-phase meter, the meter subtracts the power being exported on the battery phase from the power being imported on the other 2 phases to give you zero net imports as far as your billing is concerned. Nice.
Single-phase hybrid inverters controlled by a Reposit controller can do this.
Configuration #4: 1 single-phase battery inverter with a 3-phase solar inverter and 1 consumption CT
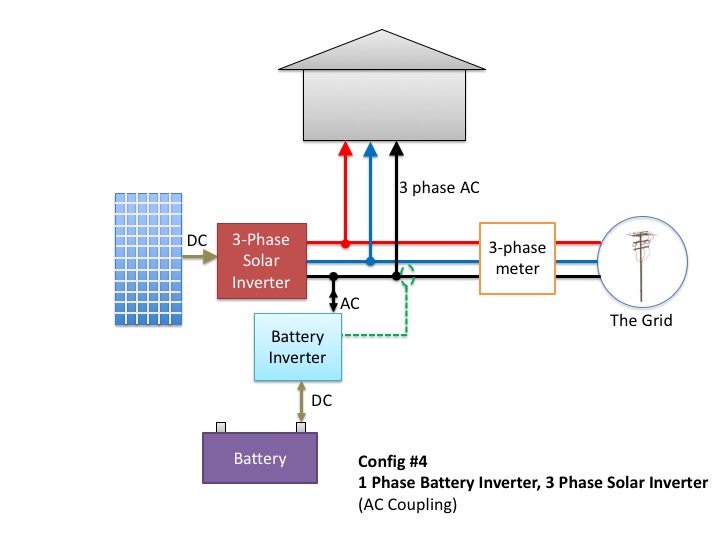
If you want to retrofit a battery to an existing three-phase solar power system, or keep your battery and solar systems on separate inverters, then you can use a battery inverter that 'AC couples' into your switchboard. That simply means that it converts the DC from the battery into 230V AC that is wired directly into your switchboard.
If the system only has one CT, then the battery can only offset your consumption on one phase.
Advantages:
- It can be retrofitted to existing solar systems without touching the solar installation.
- A single-phase battery inverter is cheaper than a 3-phase one.
- Your battery system and solar power system are separate making maintenance, warranty claims and upgrading simpler.
- A three-phase solar inverter allows you to fit more solar panels now or in the future (3 times more funnily enough)
- A three-phase solar inverter pushes the grid voltage up less when you are exporting solar electricity, reducing the chance it tripping or derating due to grid voltage rises.
Disadvantages:
- Your battery savings will only be on one phase.
- You can only back up the phase your battery is connected to.
- It is not possible to charge the battery from the solar panels during a grid-outage because the 3-phase solar inverter needs to see 230V on all phases to operate. The battery inverter can only produce 230V on one phase.
- A three-phase solar inverter costs more than a single-phase one.
Configuration #5: 1 single-phase battery inverter with a 3-phase solar inverter and 3 x CTs
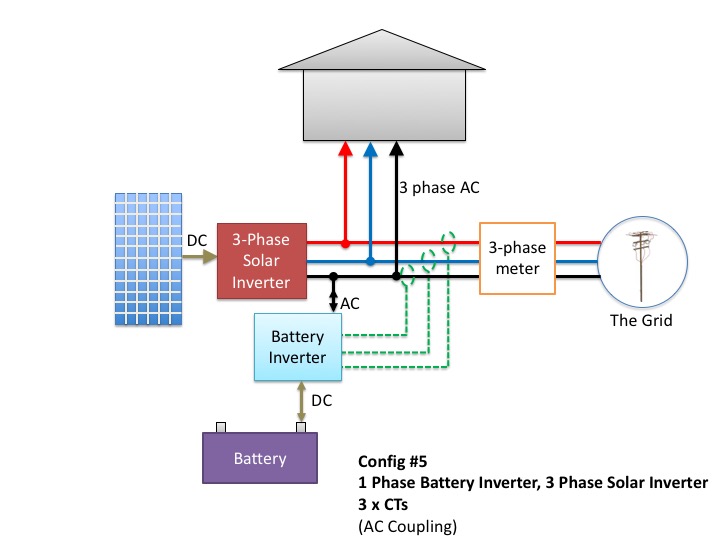
This is the same as configuration #4 but the battery inverter allows you to connect 3 CTs, one for each phase. This allows you to have the benefits of battery energy self consumption across all three-phases.
If you have a choice, always choose this over the previous configuration as it will reduce your bills more, assuming you have any appliances connected to the other 2 phases.
Configuration #6: 1 single-phase battery inverter with a single-phase solar inverter and 1 consumption CT
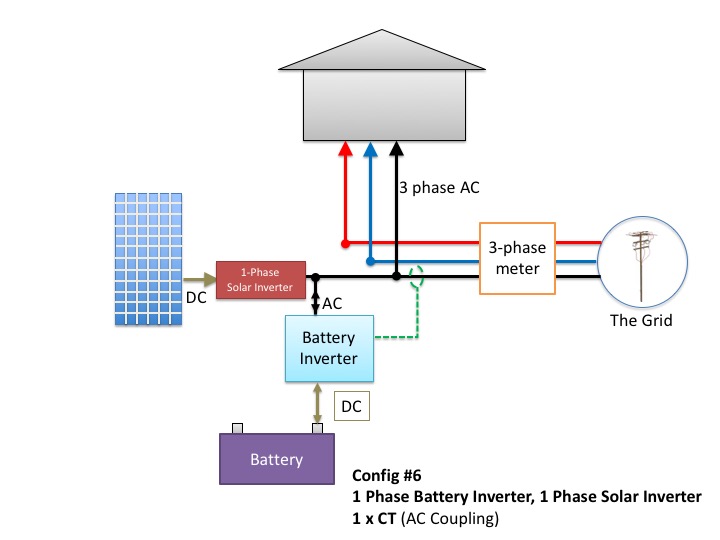
This is the same as configuration 4, but the solar uses a single-phase inverter.
Advantages over configuration #4:
- If the battery inverter offers the feature, it is possible to charge the battery from the solar panels during a grid-outage. The Powerwall 2 does this with compatible units for example.
Disadvantages over configuration #4:
- A single-phase solar inverter pushes the grid voltage up more than a 3-phase one when you are exporting solar energy, increasing the chance of voltage rise issues.
Configuration #7: 1 single-phase battery inverter with a single-phase solar inverter and 3 x consumption CTs
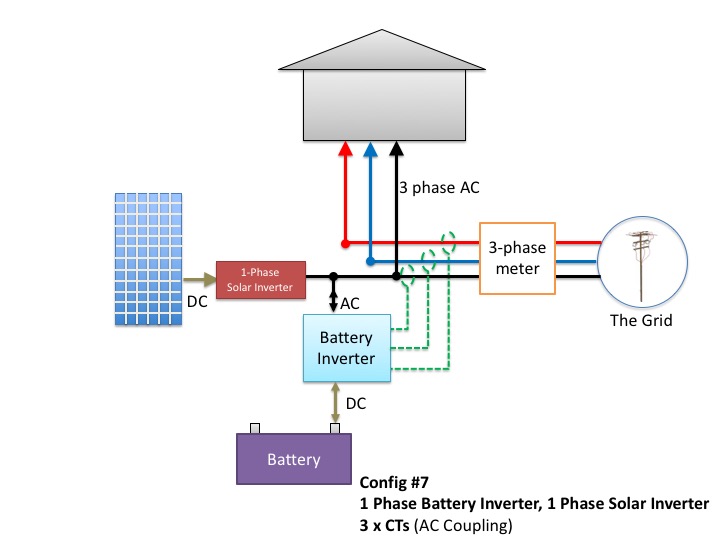
The same as the previous configuration (#6) except the battery inverter allows 3 CTs, so you can benefit from battery self consumption across all three-phases.
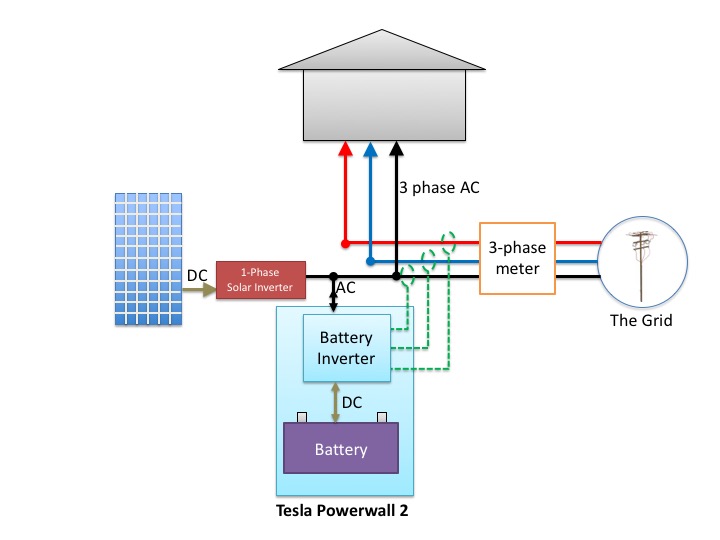
The Powerwall 2 offers this feature and is simply a battery plus battery inverter in one sleek box. It can be used with a single-phase solar inverter as shown, or a three-phase solar inverter. But with a three-phase solar inverter your battery can't charge from your solar during grid outages.
Configuration #8: Three-phase battery inverter with a three-phase solar inverter
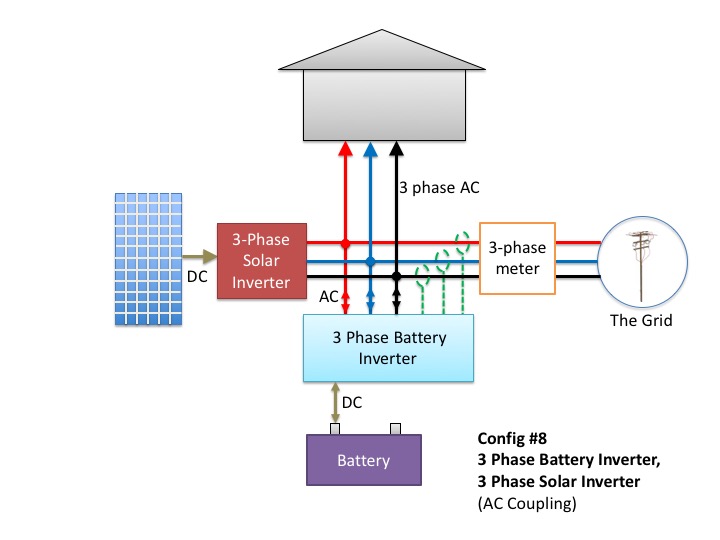
Here the battery inverter is a three-phase device, which means that it converts the DC input into 3 AC outputs.
Advantages:
- A three-phase battery inverter pushes the grid voltage up less when you are exporting battery power, reducing the chance of the battery inverter tripping or derating due to grid voltage rises. This is only an advantage if you plan to export lots of battery power to take advantage of high feed-in-tariffs or grid support functions like Reposit.
- Battery savings are across all phases.
- Backup is across all phases.
Disadvantages:
- A three-phase battery inverter is more expensive than a single-phase one.
Configuration #9: Three-phase battery inverter with a single-phase solar inverter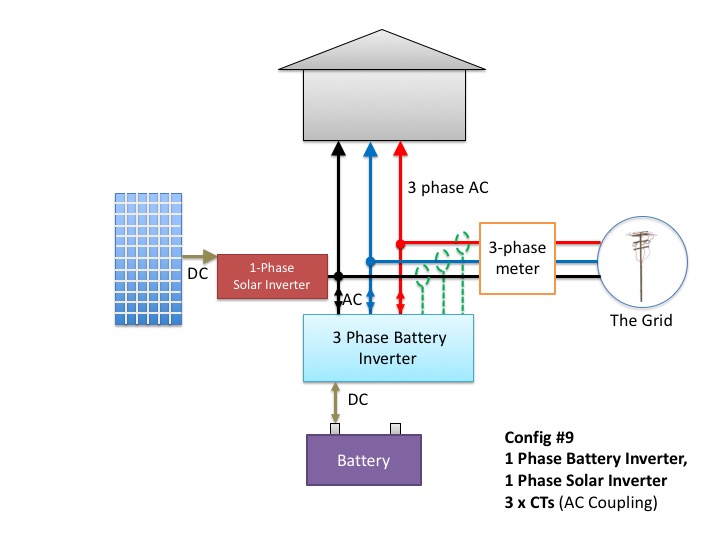
This is simply the previous configuration with a single-phase solar inverter to show you can mix a 3 phase battery inverter and single phase unit if you need to.
Configuration #10: Three batteries, three battery inverters and an inverter with a three-phase solar inverter
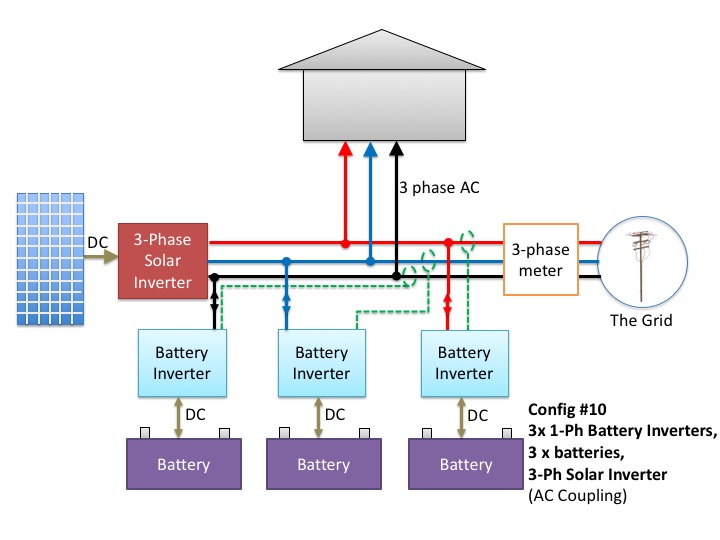
If money is no object, this is one way to get lots of solar+battery energy and power into your three-phase home.
Advantages:
- Fault tolerant. If one battery inverter goes down, the other two will hum along just fine until it is repaired.
- 3 x the power of a single battery inverter
Disadvantages:
- Expensive
- Each battery can only backup and offset the phase it is connected to.
Configuration #11: Three batteries, three battery inverters and an inverter with a single-phase solar inverter
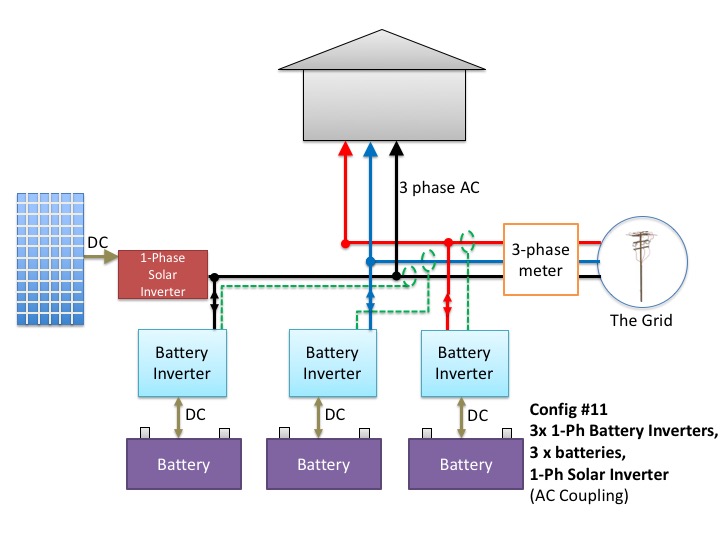
Same as previous configuration, but with single-phase solar inverter – just to show it is an option for those who want more battery power than solar power.
Configuration #12: Microinverters on a single-phase with single-phase battery inverter and one consumption CT
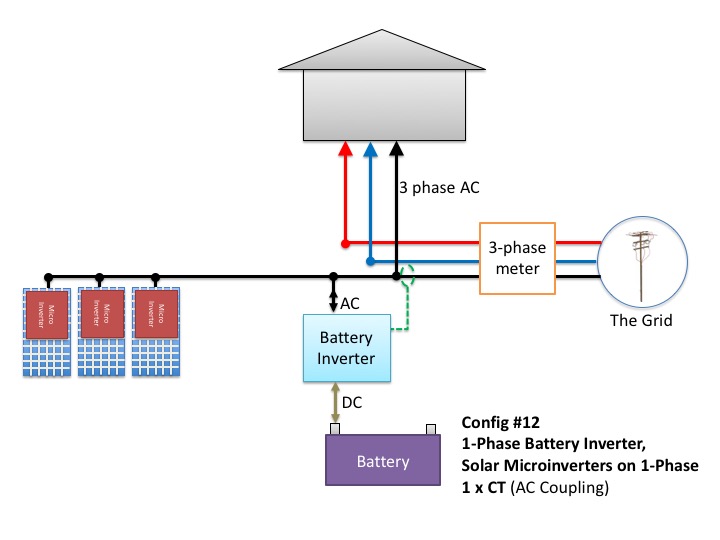
One for my fellow micro-inverter lovers. Yes, it is easy to add batteries to microinverters. But if you only have one consumption CT, you'll only get the benefits on one phase.[1. My first battery (Sunverge) was set up like this. The installer, AGL, has decided to replace it with a PowerWall 2, with 3 consumption CTs for free. I'm not gonna stop them. ]
Configuration #13: Microinverters on a single-phase with single-phase solar inverter and three consumption CTs.
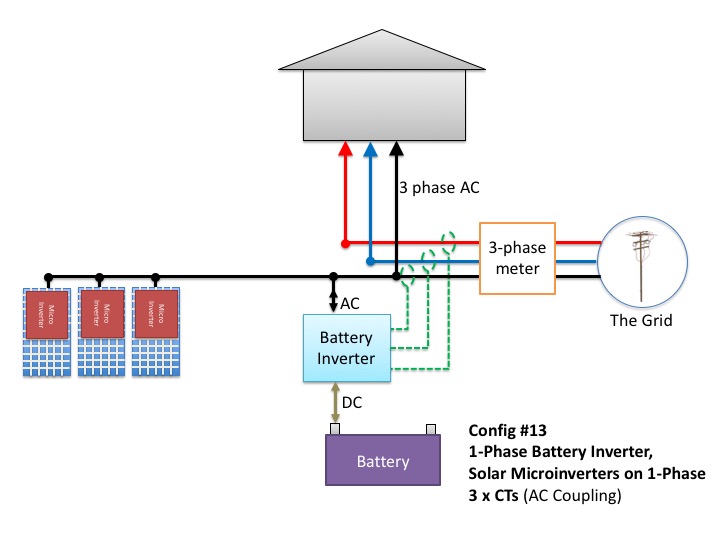
If you want a micro inverter system with batteries, make sure you get one that can accept 3 consumption CTs like this.
This is how the Powerwall 2 battery system on my house will soon be configured.
Configuration #14: Microinverters on all phases with single-phase battery inverter and one consumption CT.
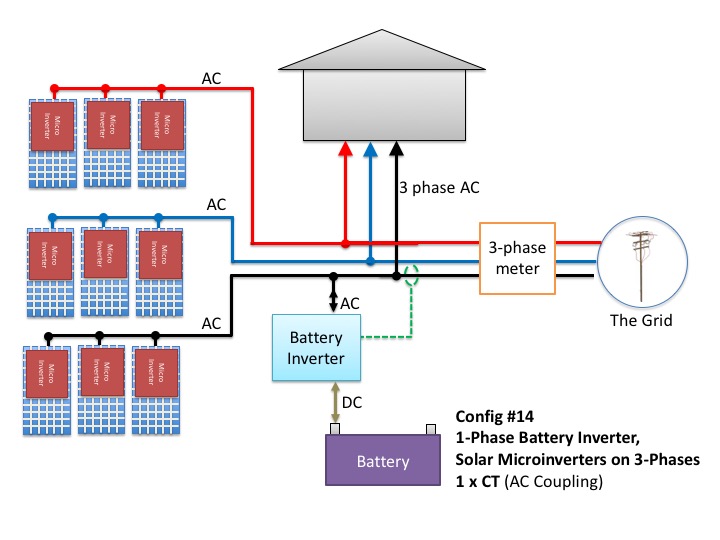
If you have your microinverters across multiple phases, then that is not a problem. The one disadvantage is if your battery inverter can charge from solar during a grid outage, you'll only be able to charge from the solar panels on the battery phase. And, again make sure you have 3 consumption CTs like this…
Configuration #15: Microinverters on all phases with single-phase battery inverter and three consumption CTs.
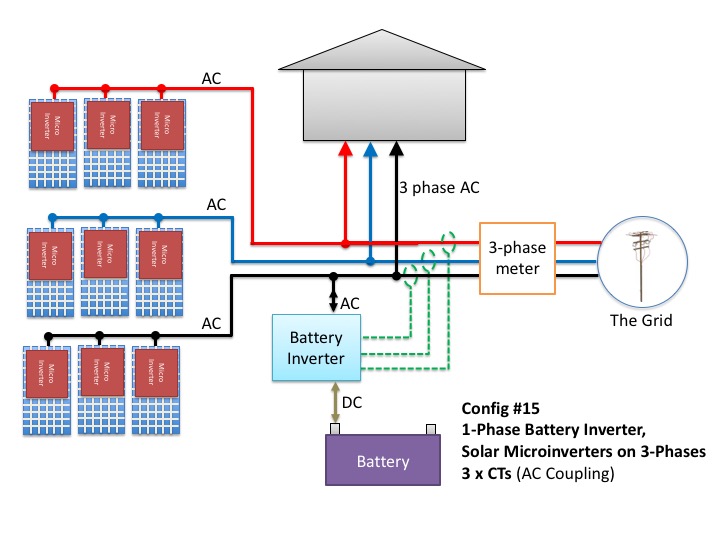
You get the idea.
Configuration #16: Microinverters on all phases with three-phase solar inverter and three consumption CTs.
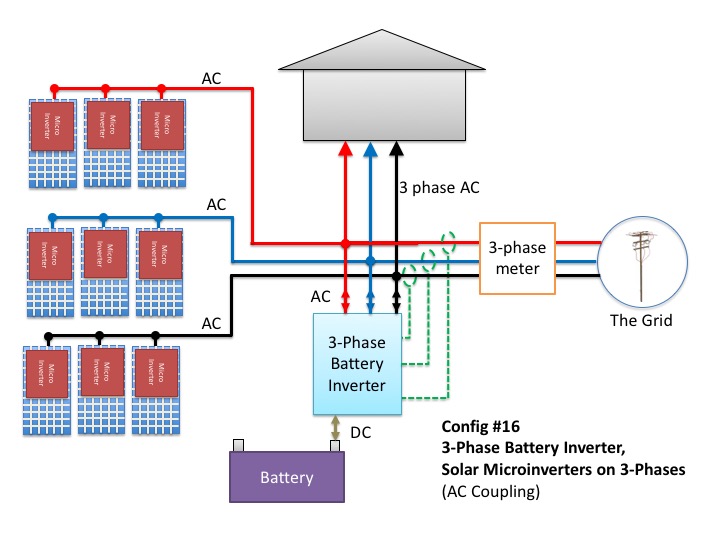
Finally – if you have microinverters on all phases and it is important to you that you can charge from all the solar panels during a grid outage, then a three-phase battery inverter with backup function will allow you to do that.
Summary
If you have a three-phase supply and want to install batteries your options are vast.
My advice If you are starting from scratch:
- If you want to install as much solar PV and battery power as possible, then consider configuration 1.
- If you are starting from scratch and are happy with 5kW of solar inverter power and 5kW of battery power, then a single-phase battery inverter, AC coupled with 3 consumption CTs is a good choice.
- If being able to charge the batteries from the solar during a grid outage is important to you, then you need a single-phase solar inverter (configuration 7). Otherwise I always recommend a three-phase solar inverter (configuration 5), as they handle voltage rise issues better.
My advice If you are retrofitting batteries to an existing system:
- When retrofitting, your choices are constrained by what you already have installed (unless you want to throw your existing solar inverter in the bin). For most people a single-phase battery inverter with 3 consumption CTs like configuration 5, or configuration 7 is a good choice.
- If you are retrofitting a battery and want bags of battery power available to export because you believe it is your duty to support the grid, then a three-phase battery inverter is for you (e.g. configuration 9).
Or if it all looks a bit too much, simply engage an experienced solar+battery installer, who can decide the best design for you. Just make sure you are clear in your requirements. Tell the installer:
- If you want self consumption on one or all phases
- If you want backup on one or all phases
- If you want to charge your batteries from your solar panels when the grid is down
- How many batteries and solar panels you want now or in the future
Then your installer will know which of the 16 configurations to work with, or might invent a whole new one just for you. You can engage 3 great installers for quotes on battery systems and retrofits here.
Footnotes
- shown as black on the diagrams ↩
- I haven't even included DC coupled systems with Solar Controllers or DC Converters ↩
- And the Fronius Symo Hybrid is only compatible with a Fronius Battery at time of writing ↩
Source: https://www.solarquotes.com.au/blog/home-batteries-3-phase/
Posted by: danielinct1941.blogspot.com

Posting Komentar untuk "3 Phase Float Switch Wiring Diagram"